


Learn How To Create Custom DocTypes in ERPNext
.png)
Let’s say you want to streamline your company’s recruitment process by capturing detailed information about job applicants and the associated institutes. Now you require a customized DocType in ERPNext's to store and manage this data efficiently. And here is a complete guide for you about DocType in ERPNext.
How To Create New Custom DocType in ERPNext?
Step 1: Create a New DocType:
- First, log in to your ERPNext instance using your administrative credentials.
- If you want to create a fresh DocType, navigate to Doctypes from the search menu and click on the "New" button.
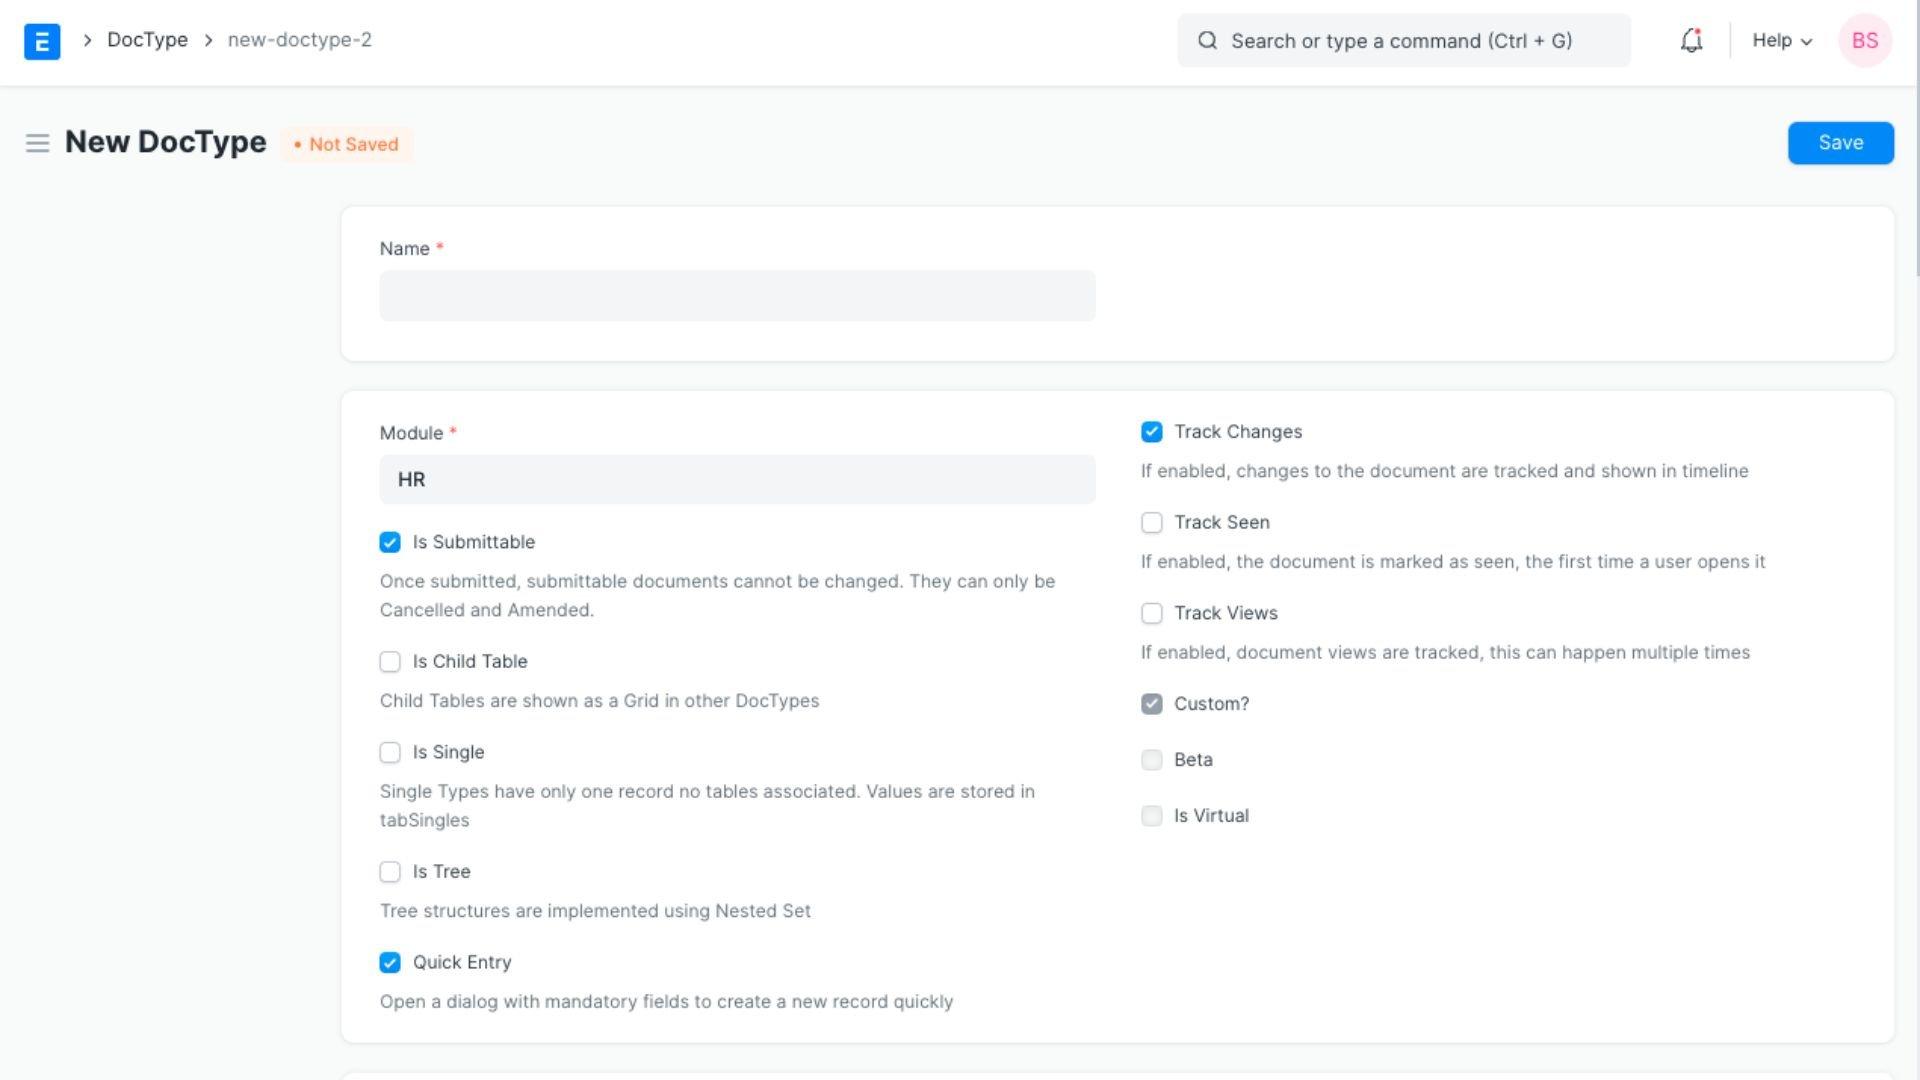
Step 3: Name the DocType:
- Provide a name for the new DocType. Give it a name to represent the Institute details.
Step 2: Select the module:
- Then select the module you want to create the doctype in, from the drop-down menu or directly search it for.
- Here to create a job application you need to select the HR module.
Step 4: Customize the Fields:
- Customize the fields for the new DocType you have created to capture the necessary information such as the Institute name, address, contact details, etc.
- Add fields by clicking on the "Add Row" button and specifying the field type, label, and other options.
Step 5: Save the DocType:
- Once you have customized the fields, click on the "Save" button to save the new DocType.
Step 6: Customize the Role Option:
- Customize the role option to define access and permissions for different user roles.
- Configure the new DocType's role settings according to your requirements.
Step 7: Create and Customize the Institute Page:
- Create a new page for the Institute details by clicking on the "New" button.
- Customize the Institute page as desired, making any additional changes or adjustments.
- Save the modifications once you have finished customizing the Institute page.
Step 8: Additional Changes and Saving:
- Make any other desired changes or customizations to the new DocType or related components.
- Once all changes are made, click on the "Save" button to save the modifications.
You want to customize the different fields in ERPNext and link another DockType within it.
How to Add Custom Fields in a DocType?
Step 1: Access the Customize Form:
- Log in to your ERPNext instance using your administrative credentials.
- Navigate to the module where the DocType is located.
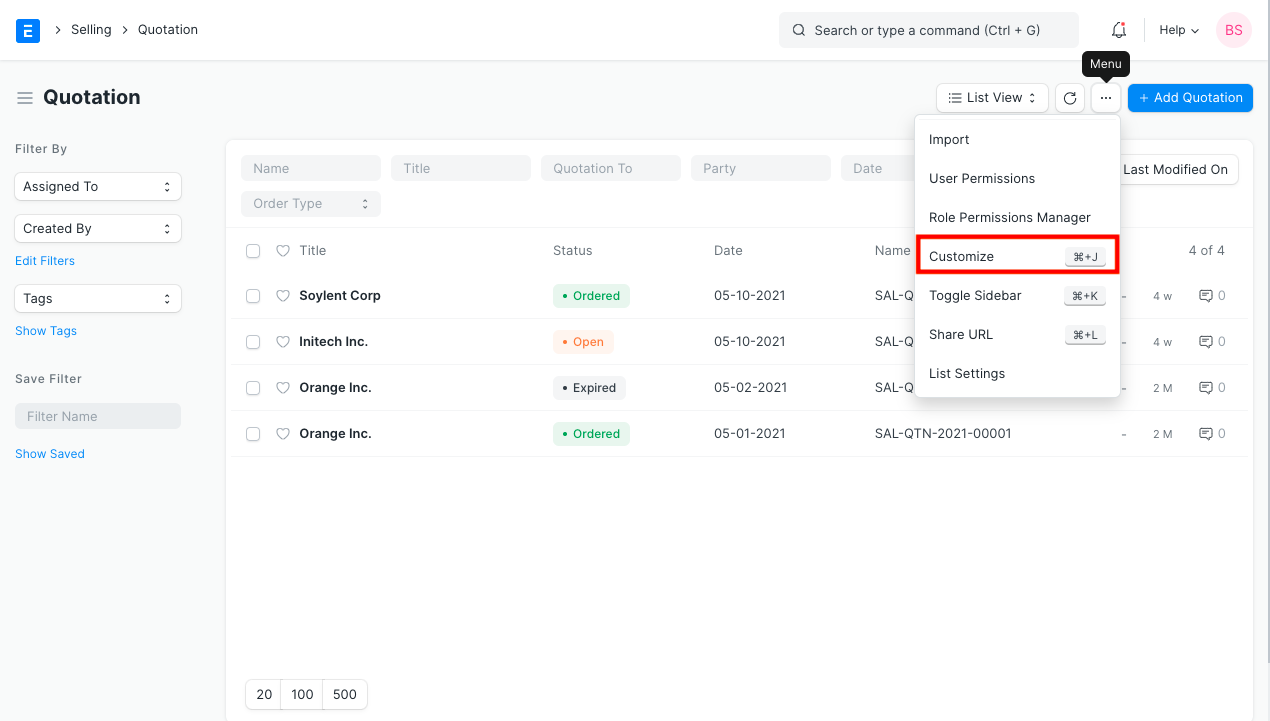
Step 2: Open the Customization Options:
- In the module, locate and click on the desired DocType.
- In the DocType form, click the "Customize" button to access the customization options.
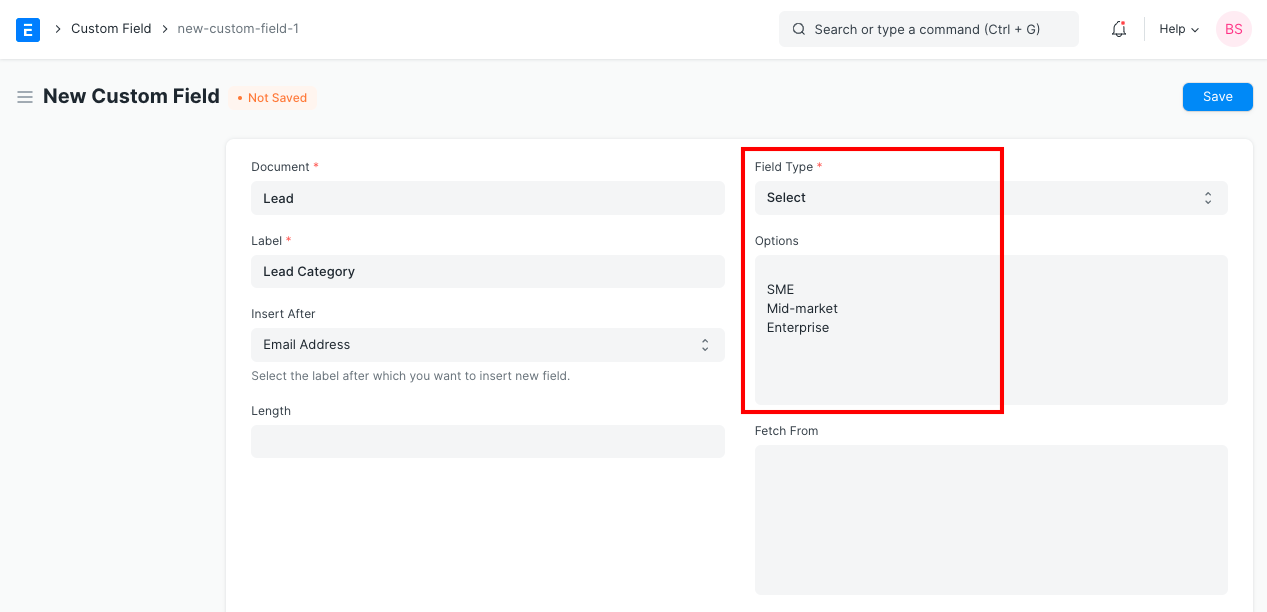
Step 3: Add a Custom Field:
- To add a new custom field, click the "Add Row" button within the customization options.
- Then based on your requirements, specify the field details, such as the field type, label, and other options.
- Save the custom field.
How to Customize a Field in ERPNext and Link Another Doctype within it?
You have already created a new custom DocType in the HR module to capture Institute details.
Now, you want to customize a field within the new DocType and link it with the existing "Job Applicant" DocType.
To customize a field in ERPNext, follow these steps:
Step 1: Access the Customize Form:
- Log in to your ERPNext instance with administrative privileges.
- From the ERPNext desk, navigate to the module where the DocType you want to customize is located.
Step 2: Open the DocType:
- Locate the DocType that contains the field you want to customize and open it.
Step 3: Go to the Customize Form View:
- In the DocType view, click on the "Customize" button or option to access the Customize Form view.
Step 4: Locate the Field to Customize:
- In the Customize Form view, locate the field you want to customize.
- Fields are typically listed in the form with their labels.
Step 5: Modify Field Properties:
- Once you've located the field, you can modify its properties according to your requirements.
- Common field properties that can be customized include:
- Label: Modify the label or display the name of the field.
- Type: If needed change the field type, such as from Text to Date, Select, or Data.
- Mandatory: Specify whether the field is mandatory or required to be filled in.
- Hidden: Choose to hide the field from the form view.
- Read-only: Set the field as read-only, preventing users from editing its value.
- Options: For select fields, define the options that users can choose from.
- Default Value: Set a default value for the field.
- Dependent Fields: Configure dependencies between fields to show or hide them based on specific conditions.
Step 6: Save the Changes:
- After making the necessary changes to the field properties, click on the "Save" button to save the changes.
Step 7: Test and Validate:
- After saving the changes you made, thoroughly test and validate the customized field.
- Create new documents or access existing ones that utilize the field and ensure it functions as expected.
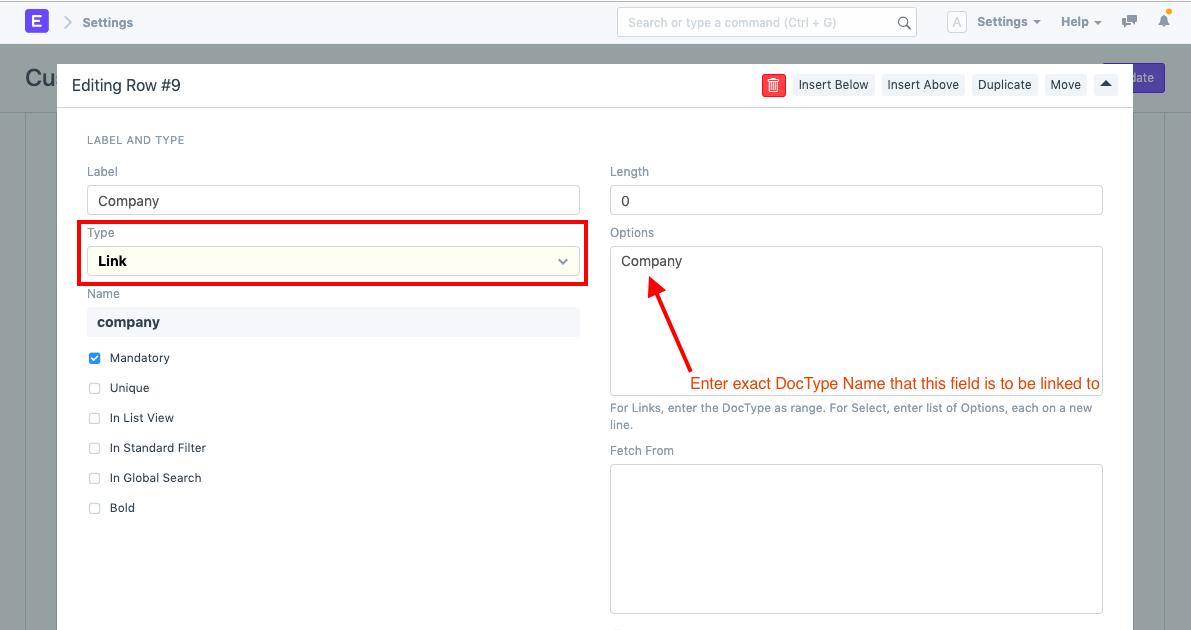
Step 8: Link Another DocType:
- Identify the field where you want to link another DocType.
- In the field properties, set the field type as "Link".
- Choose the desired DocType from the dropdown list to establish the linkage.
- Save the changes.
Now let's assume you want to customize the form for the new DocType in ERPNext's HR module to capture additional information during the application process.
How To Customize A Form In ERPNext?
Here's a step-by-step guide on how to customize a form in ERPNext:
Step 1: Access the Customize Form:
- Log in to your ERPNext instance with administrative privileges.
- From the ERPNext desk, navigate to the module where the form you want to customize is located.
Step 2: Open the Form:
- Locate the form you want to customize and open it.
Step 3: Go to the Customize Form View:
- In the form view, go to the "Customize" button or option to access the Customize Form view.
- Click on the "Customize" button to enter the Customize Form view to edit different sections.
Step 4: Customize the Form:
- In the Customize Form view, you'll have many options to customize the form layout and fields.
- Rearrange Sections: If you want to rearrange the sections within the form, click and drag the sections to the desired position.
- Customize Fields: Click on the "Customize" button next to the field you want to modify, to customize the fields within the form.
- Modify Field Properties: In the field customization view, you can modify properties like label, type, mandatory, hidden, read-only, options, default value, etc. Make the necessary changes as per your requirements.
- Add New Fields: If you want to add new fields to the form, click on the "Add Field" button.
- Specify the properties for the new field, such as label, type, and other options.
- Remove Fields: If you want to remove a field from the form, click on the "Remove" button next to the field you wish to delete.
Step 5: Save the Changes:
- After customizing the form and its fields as per your requirements, click on the "Save" button in the Customize Form view to save the changes.
Step 6: Test and Validate:
- After saving the changes, thoroughly test and validate the customized form.
- Create new documents or access existing ones to ensure that the form layout and fields align with your desired customization.
You have created a new custom form in your DockType in the HR module to capture Institute details, and now, you want to write a custom script in your newly created form to perform additional actions or validations within the form.
How to Custom Script in ERPNext?
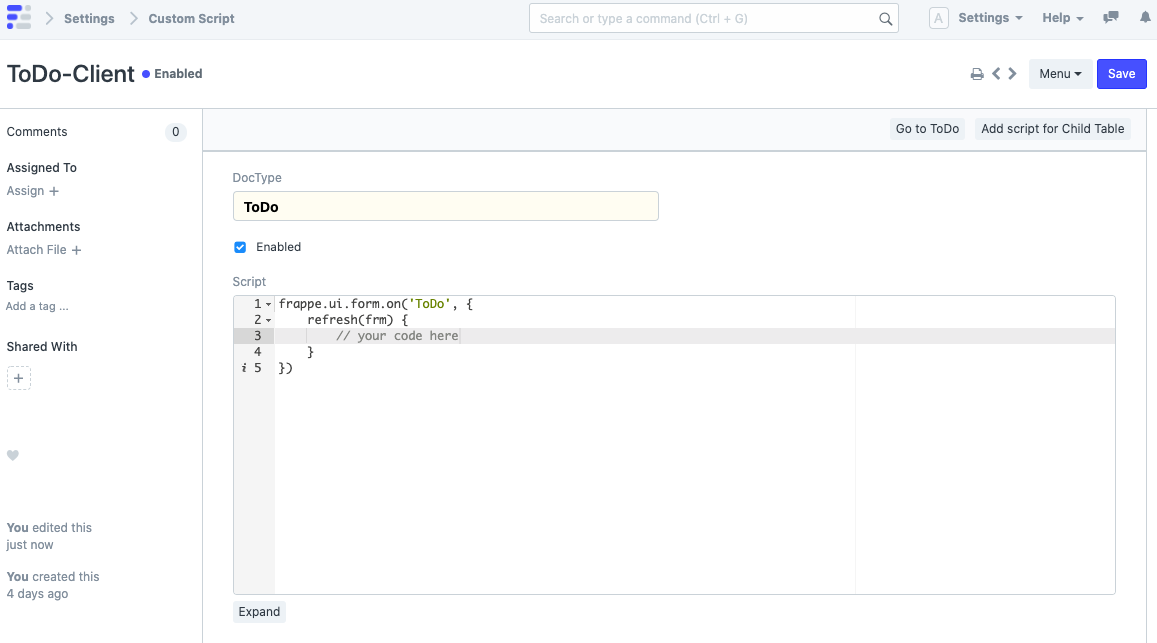
Step 1: Access the Customize Form:
- Log in to your ERPNext instance with administrative privileges.
- From the ERPNext desk, navigate to the module where you want to add a custom script.
Step 2: Open the Customize Form View:
- Open the form or doctype for which you want to make a custom script.
- Select the "Customize" button or option, usually located at the top-right corner of the form view, and click on it to enter the Customize Form view.
Step 3: Go to the Scripts Section:
- In the Customize Form view, find the "Scripts" section.
- Click on the "Add Row" button to create a new script entry.
Step 4: Define the Script:
- In the script entry, you will see fields like "Script Type," "Script," and "Description."
- In the "Script Type" field, select the appropriate script type based on your requirements. For example, you can choose "Client" for client-side scripts or "Server" for server-side scripts.
- In the "Script" field, write your custom script code. This could be JavaScript or Python code, depending on the script type you selected.
- In the "Description" field, provide a brief description of the purpose or functionality of the script.
Step 5: Save the Custom Script:
- After defining the script, click on the "Save" button to save the custom script.
Step 6: Test and Validate:
- Once the script is saved, test and validate its functionality.
- Perform actions or trigger events in the ERPNext system that should invoke the custom script and verify that the expected behavior occurs.
How to Create a DocType Workflow in ERPnext?
Step 1: Enable Workflow:
- Log in to your ERPNext instance using your administrative credentials.
- Navigate to the HR module where the new DocType is located.
- Click on the "Settings" icon in the top right corner and then select the "Workflow Settings" option.
- By checking the box next to "Enable Workflow", enable the "Workflow" feature and save the changes.
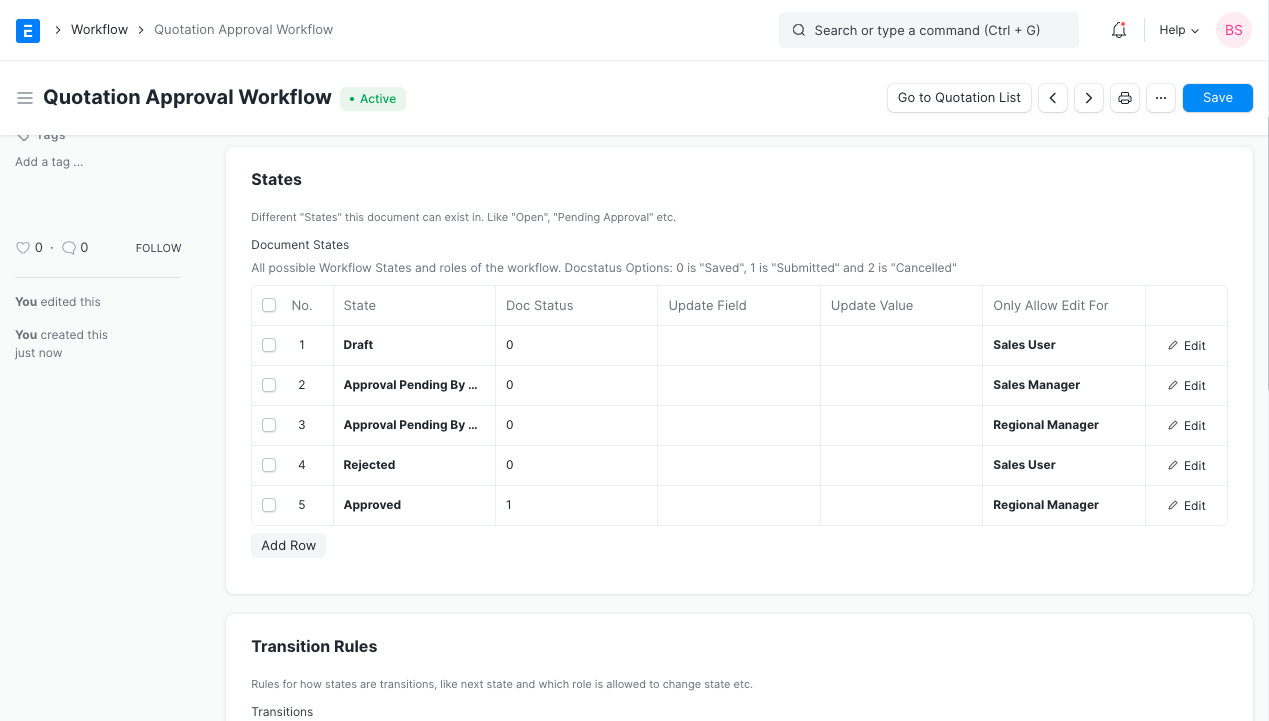
Step 2: Create Workflow States:
- Open the customization options for the new DocType you have created by clicking on the "Customize" button.
- Then in the customization options, select the "Workflow" section.
- Click on the "Add Row" button to define workflow states for the new DocType.
- Imagine three states: "Draft," "Pending Review," and "Approved."
- Save the changes to create the workflow states.
Step 3: Define Workflow Actions:
- Within the customization options of the new DocType, go to the "Workflow Actions" section.
- Click on the "Add Row" button to define actions for each state.
- Imagine an action called "Submit for Review" for the "Draft" state, leading to the "Pending Review" state.
- Add another action called "Approve" for the "Pending Review" state, transitioning to the "Approved" state.
- Set appropriate permissions and conditions for each action.
- Save the changes to define the workflow actions.
If needed add the "rejected" option
Step 4: Configure Workflow Transitions:
- Scroll down to the "Workflow Transitions" section within the customization options.
- Click on the "Add Row" button to define transitions between states.
- Set the source state, action, and target state for each transition.
- Connect the transitions from "Draft" to "Pending Review" and from "Pending Review" to "Approved."
- Save the changes to configure the workflow transitions.
Step 5: Assign Roles and Permissions:
- In the customization options of the new DocType, locate the "Permissions" section.
- Define the roles and permissions for each state and action in the workflow.
- Assign roles to control who can view, edit, submit for review, and approve documents at different workflow stages.
- Save the changes to assign roles and permissions.
Step 6: Test and Monitor Workflow:
- Create a new document or access an existing one to test the workflow.
- Submit the document for review and observe its transition from "Draft" to "Pending Review."
- Upon approval, witness the document progressing from "Pending Review" to "Approved."
- Monitor the workflow using the Workflow Dashboard to track document status and pending reviews.
In the HR module of ERPNext, you have a custom DocType called "Job Application" to capture job applicants' details. You want to enhance the Job Application form by adding a child table to capture the skills of the applicants. You create a new DocType called "Job Skills" to represent the child table that will store the skills information for each job application.
How to Create a Child Table in a DocType in ERPnext?
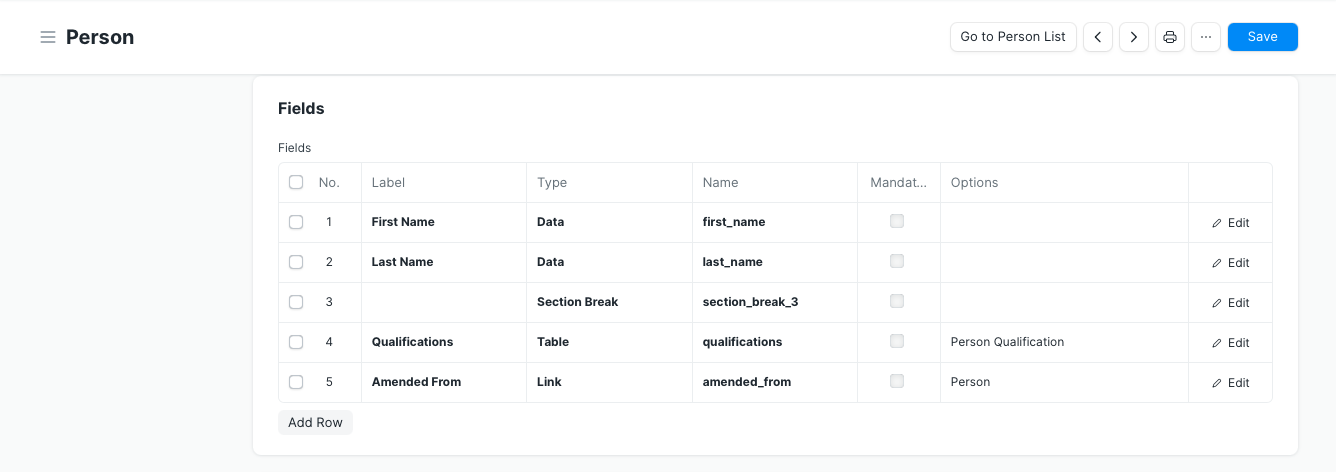
Step 1: Create a New DocType for the Child Table:
- Log in to your ERPNext instance using your administrative credentials.
- Navigate to the "Customize" module and click on "DocType".
- Click on the "New" button to create a new DocType for the child table.
- Provide a unique name (Job Skill) for the DocType and enter other relevant details such as label, module, and description.
- Define the fields and properties for the child table according to your requirements. For example, you can add fields like "Name," "Description," "Quantity," etc.
- Save the changes to create the new DocType.
Step 2: Add the Child Table to the Previous DocType:
- Navigate to the customization options of your previous DocType where you want to add the child table.
- Locate the "Table" field type within the customization options of the previous DocType.
- Click on the "Add Row" button to add a new row to the "Table" field.
- In the "Table" field row, select the newly created child table DocType from the dropdown.
- Set the label and other properties for the child table field as desired.
- 6. Save the changes to add the child table to the previous DocType.
Step 3: Test and Use the Child Table:
- Create a new document of the previous DocType (e.g., "Hybrowlabs").
- You will now see the added child table field within the document.
- Click on the "+" icon in the child table field to add new rows and enter relevant data in the fields of the child table.
- Save the document to store the information in the child table.
- You can now view and manage the child table records within the parent document.
Now let’s say, you are the HR manager of a growing company, and you use ERPNext to manage your hiring process. You have created a custom DocType to track and manage job vacancies in different departments.
How to Set Different Notifications for Different Job Openings in a Doctype in ERPNext?
Step 1: Define Notification Rules:
- Log in to your ERPNext instance using your administrative credentials.
- Navigate to the module where your custom DocType for job openings is located.
- Open the customization options for the DocType by clicking on the "Customize" button.
- Within the customization options, locate the "Notifications" section.
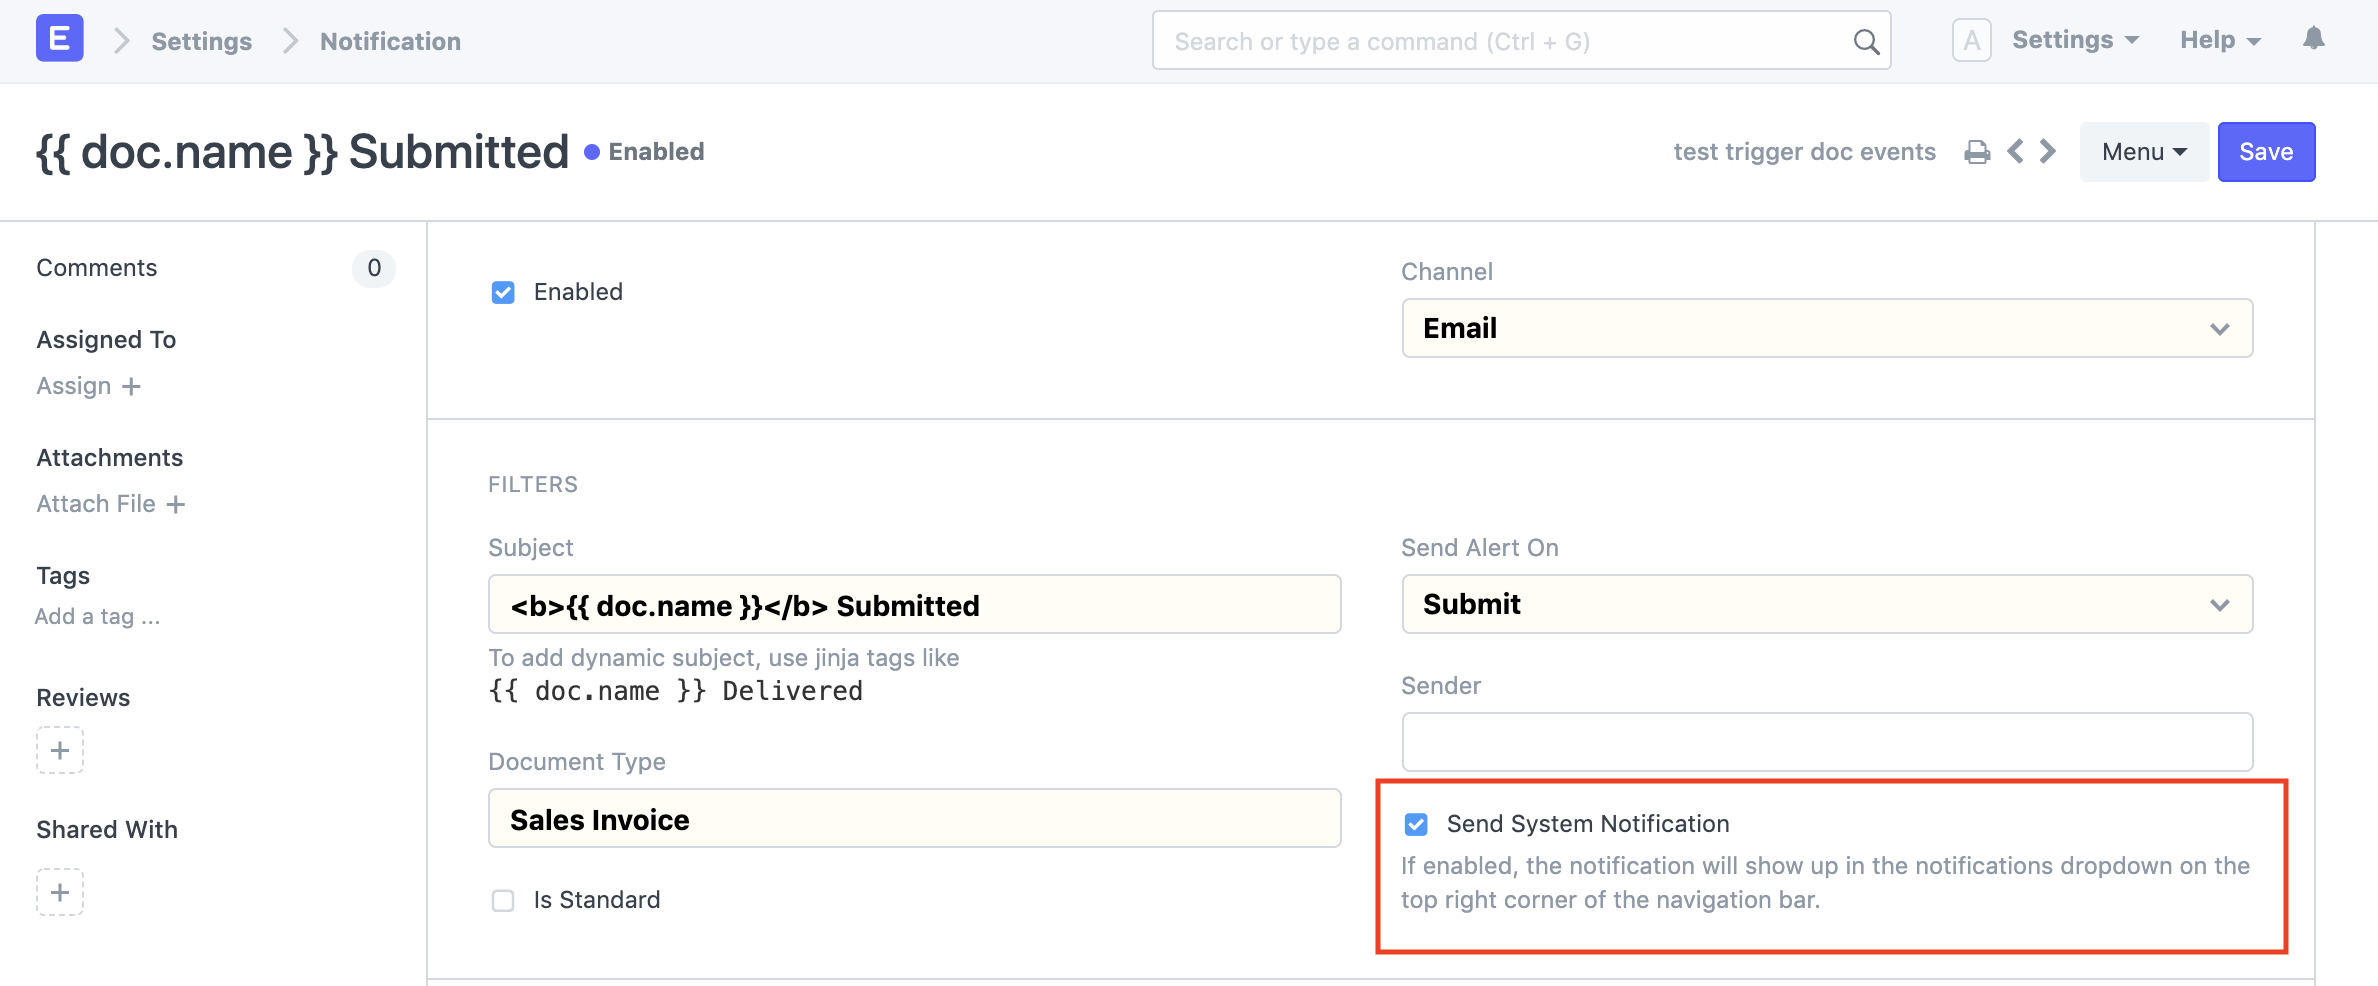
Step 2: Add Notification Rules:
- Click on the "Add Row" button within the "Notifications" section to add and describe a new notification rule.
- Set the conditions under which the notification should be triggered. For example, you can set the condition to match a specific job opening based on its attributes or status.
- Define the recipients of the notification. It can be a specific user, a role, or a distribution list.
- Set the method of notification like email, SMS, or an internal ERPNext notification.
- Save the changes to add the notification rule.
Step 3: Repeat for Different Job Openings:
- Repeat the above steps to add notification rules for other job openings with different conditions, recipients, and notification methods.
- Customize the conditions, recipients, and methods according to the requirements of each job opening.
- Save the changes after adding each notification rule for different job openings.
Conclusion:
In conclusion, customizing a DocType in ERPNext empowers businesses to tailor their ERP system to their specific needs and processes. By creating custom DocTypes, customizing fields, and writing custom scripts, businesses can enhance data capture, streamline workflows, and add specialized functionalities.
If you are looking for developing your ERP system for your business partner with Hybrowlabs for the best experience in ERPNext development. At Hybrowlabs we provide an opportunity to leverage our expertise in ERPNext customization and development. Our experience and knowledge can ensure a seamless and efficient implementation of custom DocTypes, field customization, and custom scripts. This partnership will enable your business to maximize the benefits of ERPNext and achieve a highly customized ERP solution that aligns with your unique requirements. Visit our service page to know more about how we can help your business!
FAQ:
1. Can I customize the layout and appearance of a custom DocType form?
Yes, ERPNext provides customization options to rearrange fields, add sections, set field properties, and modify the visual elements of the form to create a user-friendly and intuitive interface.
2. How can I link a custom DocType with other existing DocTypes in ERPNext?
You can establish relationships between DocTypes by defining fields of type "Link" that connect to other DocTypes, enabling you to reference and associate related records.
3. Is it possible to create custom workflows for custom DocTypes?
Yes, ERPNext supports the creation of custom workflows for both standard and custom DocTypes. Workflows allow you to define the stages, actions, and approvals required for document progression.
4. What role does customization play in ERPNext implementation and maintenance?
Customization allows you to align ERPNext with your organization's specific requirements, but it's important to balance customization with the potential impact on future updates and maintenance efforts to ensure a stable and sustainable system.
5. Can I import or export custom DocTypes in ERPNext?
Yes, ERPNext provides data import and export tools that enable you to migrate or share custom DocTypes between ERPNext instances.


Similar readings
a3dc85.jpg)
.jpg)

Apoorva
25-11-2025
Advanced RAG 04: Contextual Compressors & Filters
technology
fd8f11.png)

.jpg)
.jpg)
Industries We Serve
